


Start around 18 to 30 PSI, running your rear tire 2 to 5 PSI higher than your front. That gap keeps your rear tire, which carries more of your weight under braking and power, from squirming or pinch-flatting while your front stays supple enough to grip. Tubeless riders can drop toward the bottom of that range; tube riders need to stay closer to the top. Check the quick-start chart below to dial in your exact numbers before you roll out.
TL;DR:
- Riders should adjust tire pressure based on system weight, with heavier setups requiring about 1 PSI more per extra 15 to 20 pounds.
- Widening tire width or rim width allows for lower pressure, with wider rims providing better support and reducing necessary PSI.
- Terrain conditions, like rocky or loose trails, demand higher or lower pressures respectively, to protect rims or increase traction.
- Proper setup requires on-trail fine-tuning with gradual 1 to 2 PSI adjustments based on cornering, braking, and rim strike feedback.
- Logging trail conditions, tire model, and PSI helps accurately repeat optimal pressures and avoids guesswork for future rides.
Table of Contents
- Mountain Bike Tire Pressure Chart By Weight And Tire Width
- What Changes Your Ideal Tire Pressure
- How To Fine-Tune Your Tire Pressure On The Trail
- Common Tire Problems And The PSI Fix
- Gauges, Pumps, And Your Pre-Ride Pressure Check
- Expert Notes From Socalcycling On Dialing In Pressure
- Our Take On Getting Tire Pressure Right
- Sources
- FAQ
Mountain Bike Tire Pressure Chart By Weight And Tire Width
Your total system weight, meaning you, your bike, and everything in your pack, matters more than rider weight alone when picking a starting PSI. A weight-banded chart gives a far better baseline than guessing off body weight, since a 150-pound rider on a 34-pound enduro bike with a hydration pack is closer to 190 pounds of total system weight on the trail.
Here’s a practical starting point for a 2.4 to 2.6-inch tire, measured in front/rear PSI:
| System Weight | Front PSI | Rear PSI |
|---|---|---|
| Light (under 150 lbs) | 18–20 | 23–24 |
| Average (150–190 lbs) | 21–25 | 24–26 |
| Heavy (over 190 lbs) | 25–27 | 28–29 |
Tire width shifts these numbers too. A narrow 2.2-inch tire needs roughly 1 to 3 PSI more than a wide 2.6-inch tire at the same weight, since less air volume means less cushion against rim strikes. Widen out to a 2.8 or 3.0-inch plus-size tire and you can often drop another 1 to 2 PSI.
Setup type changes your math from there:
- Tubeless: Run 2 to 5 PSI lower than you would with tubes, since there’s no tube to pinch against the rim.
- Butyl tubes: Add 2 to 4 PSI over your tubeless baseline to avoid pinch flats.
- TPU tubes: Sit 1 to 3 PSI below butyl, closer to tubeless numbers, thanks to their thinner wall and lower rolling resistance.
Before you commit to any number, check the sidewall of your tire for the printed minimum and maximum, and confirm your rim’s width rating matches the tire. Running a narrow tire on a wide rim (or vice versa) throws off every number in that table.
What Changes Your Ideal Tire Pressure
Six variables push your baseline up or down, and once you know the direction, you can adjust in seconds instead of guessing all day.
System weight is the biggest lever. Add a loaded pack, a heavier riding partner’s gear, or winter layers, and you’re adding pounds that compress your tire more under impact. A good rule of thumb: every extra 15 to 20 pounds of system weight calls for roughly 1 PSI more.
Tire width and casing work together. A single-ply trail casing flexes more than a dual-ply enduro casing at the same pressure, so a tougher casing can often run 1 to 2 PSI lower while still resisting rim strikes.
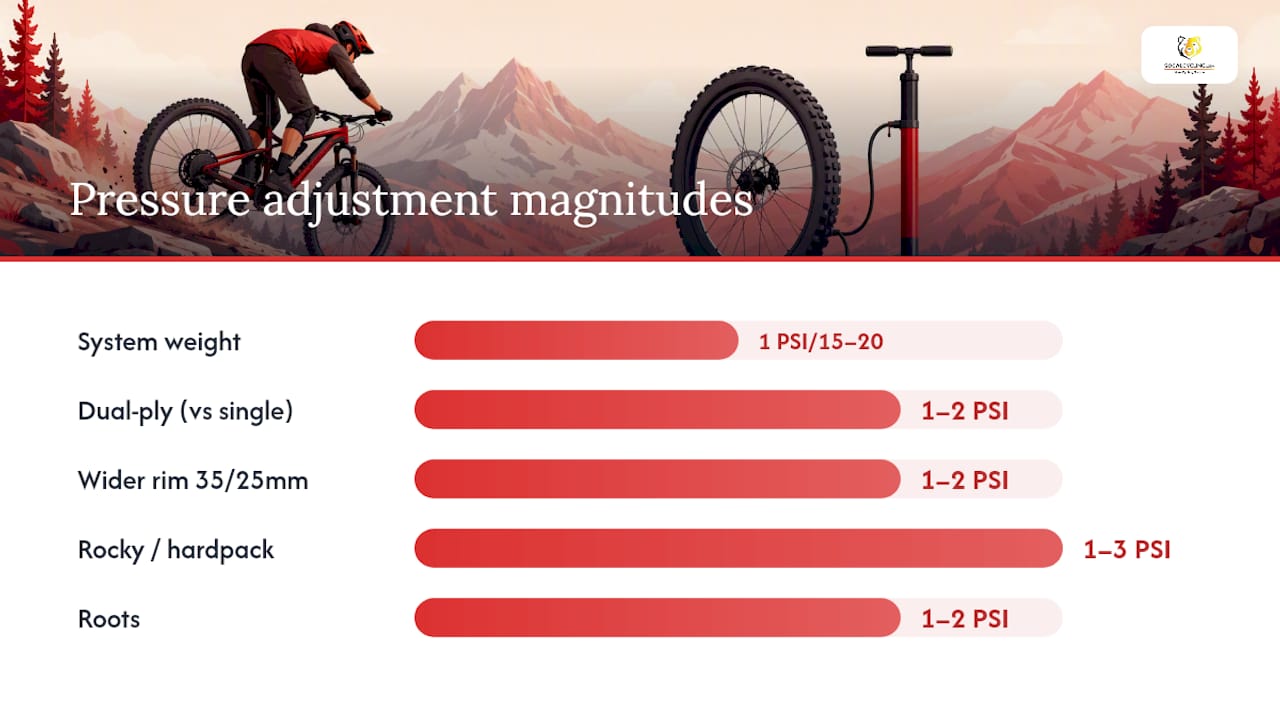
Rim width matters more than most riders realize. A wider internal rim width stretches the tire’s profile, effectively adding support at the sidewalls. That means you can often run 1 to 2 PSI lower on a 35mm internal rim than you would on a 25mm rim with the same tire.
Terrain is where daily tuning happens. Rocky, technical trails demand more air to protect your rims, while wet roots and loam often reward lower pressure for extra traction:
- Rocky or hardpack terrain: add 1 to 3 PSI to guard against rim strikes.
- Wet, loamy, or loose soil: drop 1 to 3 PSI for a bigger tire footprint and grip.
- Root-heavy trails: drop 1 to 2 PSI to help the tire wrap around obstacles instead of bouncing off them.
Riding style shifts the same numbers again. Aggressive riders who jump, brake hard, and carry speed into rock gardens need more air as insurance against flats and dented rims. Smoother, more absorption-oriented riders can safely run softer setups since they’re loading the tire less violently on impact.
Temperature rounds out the list. Cold mornings measure lower on the gauge than warm afternoons, so a pressure you set at dawn may read differently by the time you’re at the trailhead three hours later. Recheck before you clip in, especially with a big temperature swing between your garage and the parking lot.
How To Fine-Tune Your Tire Pressure On The Trail
Setting a number at home is only step one. The real dial-in happens on dirt, and it takes fewer than 15 minutes if you follow a routine instead of chasing random half-PSI tweaks.
- Check your baseline before you leave. Seat the bead fully, confirm sealant level if you’re tubeless, and verify you’re within the tire’s printed min/max range.
- Run a slow-speed curb or log test. Roll off a curb or small ledge at low speed and feel for a harsh metallic clank, a sign your rim is striking the ground through the tire.
- Take a familiar corner at speed. Vague steering or a mushy, wallowing feel in the turn usually means the sidewall is squirming, a signal to add air.
- Climb a loose pitch and brake hard on a descent. Watch for rear-wheel traction loss on the climb and skipping or bouncing under braking.
- Adjust in 1 to 2 PSI increments per test, not more. Bigger jumps make it hard to isolate which change actually fixed the problem.
- Stop adjusting once you get one clean lap with no rim strikes, no squirm, and confident traction through the corner and climb you tested.
- Log the final numbers against the trail name and conditions so you’re not starting from scratch next visit.
Pro Tip: Keep a note on your phone with tire model, rim width, system weight, and the PSI that worked for each trail. Conditions repeat more than you’d think, and that log turns a 15-minute trial-and-error session into a 30-second pump job.
Common Tire Problems And The PSI Fix
Most tire failures on the trail trace back to one of five patterns, and each has a specific fix rather than a vague “add some air” response.
- Pinch flats on tubed setups: Raise pressure 2 to 3 PSI, or switch to tubeless with sealant to remove the pinch-flat risk entirely.
- Rim strikes or dents: Add 1 to 2 PSI immediately, inspect the rim for cracks or flat spots, and consider a tire insert if strikes keep happening on the same trail.
- Burping air on hard corners: Increase pressure 1 to 2 PSI, reseat the bead fully, and double-check your tubeless rim tape and valve seal.
- Squirmy, vague cornering feel: Add 1 to 2 PSI, or move to a tougher casing that supports the sidewall better at lower pressure.
- Harsh ride with poor small-bump traction: You’re likely overinflated. Drop 1 to 2 PSI and retest the same section before dropping further.
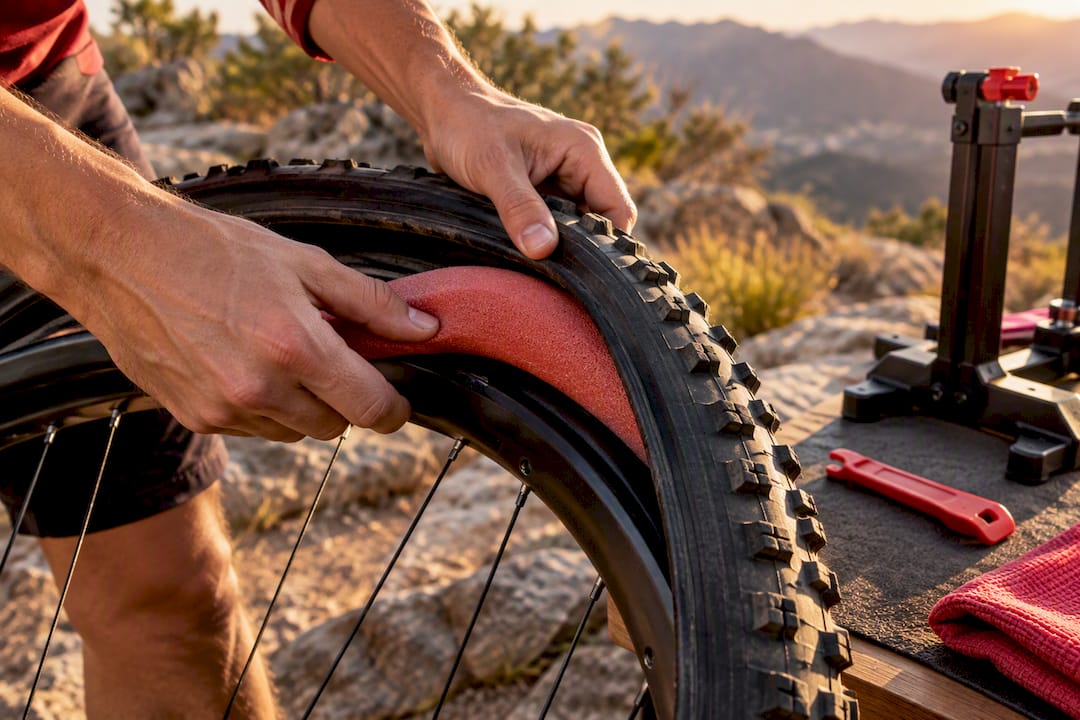
Inserts deserve a specific mention here. They let you run pressure roughly 1 to 2 PSI lower while cutting rim-strike risk, but they don’t stop burping or sidewall cuts on their own. Pair an insert with proper tubeless setup, not as a replacement for it.
Gauges, Pumps, And Your Pre-Ride Pressure Check
A pump-head gauge built into a cheap floor pump can be off by several PSI. Digital gauges give more accurate, repeatable readings, which matters when you’re chasing a 1 PSI difference between two test laps.
For a home setup, a quality floor pump with a built-in digital or well-calibrated analog gauge gets you close every time. On the trail, carry a compact mini-pump or CO2 inflator so you can correct pressure after a flat fix without guessing.
Run through this before every ride:
- Check current PSI against your logged baseline for that trail.
- For tubeless, confirm sealant level and that valve cores aren’t clogged.
- For tubed setups, check the tube for existing patches or thin spots.
- Recheck pressure right before you clip in, especially after a temperature swing.
- Log any changes made mid-ride so your next setup starts smarter.
Expert Notes From Socalcycling On Dialing In Pressure
The single habit that separates riders who chase flats all season from riders who don’t is logging. Track tire model, rim width, system weight, and the PSI that worked, and your setup stops being guesswork after two or three rides.
Inserts make the most sense for heavier riders or anyone hitting rocky, technical terrain often enough that rim strikes are a recurring cost rather than a rare event. They’re not a substitute for correct pressure. They’re a buffer that lets your correct pressure run slightly lower without punishing your rims.
Respect the printed min and max on your tire’s sidewall every time, and confirm rim width compatibility before you trust any chart, including this one. For more context on how weight distribution factors into pressure choices, riders can also look at bike fit fundamentals, since position on the bike changes how weight loads your front versus rear wheel.
For readers heading out to test these numbers on unfamiliar dirt, our guide to finding mountain bike trails nearby pairs well with a fresh pressure log. If you’re carrying extra gear on a longer ride, our ride calorie calculator can help you estimate how much added weight you’re really hauling.
Pro Tip: If you’re switching between a hardtail and a full-suspension bike, don’t copy pressures across them. Your suspension setup changes how much work the tire itself needs to do, so retest from scratch on each bike.
Our Take On Getting Tire Pressure Right
The weight-and-terrain chart approach beats generic “run 25 PSI and forget it” advice because it gives you a real starting point instead of a myth. But the chart is only half the job. Too many riders set a number once at home and never touch it again, even as they ride rockier trails, add a hydration pack, or swap to a different tire width.
The gap in most advice online isn’t the numbers, it’s the testing discipline. Riders read a chart, set their pump, and call it done. The curb test, the cornering test, the climb and brake check described above take maybe ten extra minutes, and they catch problems a static chart never will, like a rim rated wider than your tire assumes or a casing that flexes more than average.
If you take one thing from this guide, make it the logging habit. A phone note with trail name, conditions, and the PSI that worked turns every future ride into a 30-second pump job instead of a guessing game. That’s a bigger performance gain than chasing the “perfect” number most riders never actually need.
— SoCalCycling.com
Sources
For deeper reference, Polygon’s PSI chart by weight and terrain covers baseline ranges in detail. BikeRadar’s trail-tech breakdown explains terrain-specific tuning. BikeTestReviews’ weight-based chart offers another system-weight approach worth cross-checking against your own numbers. For tubeless-specific guidance, The Sport Factory’s tubeless pressure guide is a solid shop-tested reference.
FAQ
Is 40 PSI too much for mountain bike tires?
Yes, for nearly all mountain bike tires and terrain, 40 PSI is well above the useful range. Most riders land within an 18 to 30 PSI window, and 40 PSI will feel harsh, skip over roots and rocks, and hurt traction significantly.
What PSI should 27.5-inch mountain bike tires be?
Wheel size doesn’t change the pressure formula. Tires follow the same system-weight and tire-width guidance, typically landing in the 18 to 30 PSI range with the rear running 2 to 5 PSI higher than the front.
Is 35 PSI too high for bike tires?
For most mountain bike tires and trail riding, yes, 35 PSI sits above the useful range and will reduce grip and comfort. It might make sense briefly for a very heavy rider on rocky terrain with a narrow tire, but it’s outside the typical 18 to 30 PSI window most riders should target.
How can you tell if a bike tire is overinflated?
An overinflated tire feels harsh over small bumps, bounces off roots and rocks instead of absorbing them, and loses traction in corners because it can’t conform to the trail surface. Drop 1 to 2 PSI and retest the same section, and if the ride smooths out and grip improves, you found your answer.
Should I run different pressure for wet trails versus dry trails?
Yes. Wet, loamy, or loose conditions typically call for 1 to 3 PSI less than dry hardpack, since a slightly softer tire creates a larger footprint for grip. Rocky or hardpack terrain goes the other direction, usually needing 1 to 3 PSI more to protect your rims from strikes.
Recommended
- Dial In 3 Bike Fit Contact Points Using a Trainer, Level, and Video
- Plan a Ride Within 40 Miles: Mountain Bike Trails With App Checks
- Cyclists’ 15–25 Minute Race Day Warm Up That Wins Starts
- Strength Training for Cyclists: 12-Week Power Plan