


You can get a comfortable, safe, and efficient position on your bike by dialing in three contact points: saddle height and setback, handlebar reach and height, and pedal or cleat alignment. Nail those three, and you’ll ride farther with fewer aches, less numbness, and a smoother pedal stroke. A DIY pass gets most riders into a solid working range. Persistent pain or a performance goal is when it’s time to book a professional fit.
TL;DR:
- Proper saddle height should allow your leg to almost fully straighten at the bottom of the pedal stroke, which can be confirmed by the heel method or inseam formula.
- Saddle fore and aft positioning impacts knee tracking; it should be adjusted so the plumb line drops directly over the pedal axle at 3 o’clock.
- Handlebar reach and height should feel natural, with slight variations based on riding style, and can often be improved by stem adjustments or tilting bars slightly upward.
- Proper foot placement involves positioning the ball of the foot over the pedal spindle and adjusting cleat angle and fore-aft position with careful trial and small incremental changes.
- When persistent pain or discomfort remains after DIY adjustments, a professional bike fit is recommended, especially for performance goals or addressing chronic joint issues.
Table of Contents
- Bike Fit Basics: Six Quick Checks Before You Adjust Anything
- Frame Size and Standover: What Adjustments Can’t Fix
- Saddle Height: Two Starting Points and How to Fine-Tune
- Saddle Fore/Aft and Tilt: Fixing Knee Tracking
- Handlebar Reach and Height: Comfort Without Losing Control
- Cleats and Pedals: Where Foot Placement Protects Your Knees
- The DIY Workflow: Tools, Setup, and Video Verification
- Symptoms and Troubleshooting: Matching Pain to the Fix
- When to See a Professional Fitter
- How a cycling resource can fit into your fit journey
- Get Help Finding a Local Fitter
- A Fitter’s One Rule Worth Following
- Sources
Bike Fit Basics: Six Quick Checks Before You Adjust Anything
Before you grab an Allen key, run through this baseline check. It takes ten minutes and tells you where the real problems are hiding.
- Standover clearance: straddle the top tube with both feet flat. You want an inch or two of daylight, more for mountain bikes.
- Saddle height (heel method): pedal backward with your heel on the pedal. Your leg should almost fully straighten at the bottom.
- Plumb-line fore/aft: drop a string from your kneecap at the 3 o’clock pedal position and see where it lands relative to the pedal axle.
- Handlebar reach feel: on the hoods, your elbows should have a slight bend, not a straight-arm lock or a cramped hunch.
- Cleat baseline: the ball of your foot should sit roughly over the pedal spindle.
- Stability test: set the bike on a trainer or against a wall and check it’s level before you trust any measurement you take.
Frame Size and Standover: What Adjustments Can’t Fix
Standover height tells you whether a frame is even in the right ballpark. Straddle the bike in flat shoes, both feet on the ground, and check the clearance between you and the top tube. Road and mountain bikes require enough clearance over the top tube for safe mounting and dismounting, with mountain bikes generally needing more clearance due to terrain. That’s the easy part.
The harder part is the effective cockpit, meaning stack (how tall the front end sits) and reach (how far you lean to the bars). Two bikes with the same seat tube length can fit completely differently once you factor in stack and reach. Stems and spacers can shift your position by a centimeter or two, but they can’t rescue a frame that’s fundamentally too long or too short. If you’re swapping stems significantly from stock or adding many spacers just to get comfortable, consider whether a different frame size in the same model would be a better solution.
Saddle Height: Two Starting Points and How to Fine-Tune
Two methods get you close before you ever swing a leg over. The heel method: sit on the saddle, place your heel on the pedal at its lowest point, and pedal backward. Your leg should reach full extension without rocking your hip. If your hip dips to reach the pedal, the saddle is too high. If your knee stays bent, it’s too low.
The inseam formula, sometimes called the LeMond method, is more precise. Measure your inseam standing barefoot against a wall, then multiply it by 0.883. That number is your target distance from the center of the bottom bracket to the top of the saddle, measured along the seat tube line.
Watch for symptoms. Front-of-knee pain usually means the saddle sits too low. Back-of-knee pain or hip rocking points to too high. Adjust in small increments and give it at least one or two full rides before you touch it again. Changing too much at once just buries the real problem under a new one.
Saddle Fore/Aft and Tilt: Fixing Knee Tracking
The plumb-line check settles your saddle’s front-to-back position. Sit on the bike, clip in, and rotate the pedal to 3 o’clock. Drop a string with a weight from the bony bump just below your kneecap. It should land right over the pedal axle. If it falls in front of the axle, slide the saddle back. If it falls behind, slide it forward.
This isn’t a cosmetic tweak. Shifting the saddle forward loads your quads more and shortens your effective reach to the bars. Sliding it back opens your hip angle and shifts work toward your hamstrings and glutes. Either direction, done wrong, tugs your knee out of its natural tracking line and stresses the joint over hundreds of pedal strokes per mile.
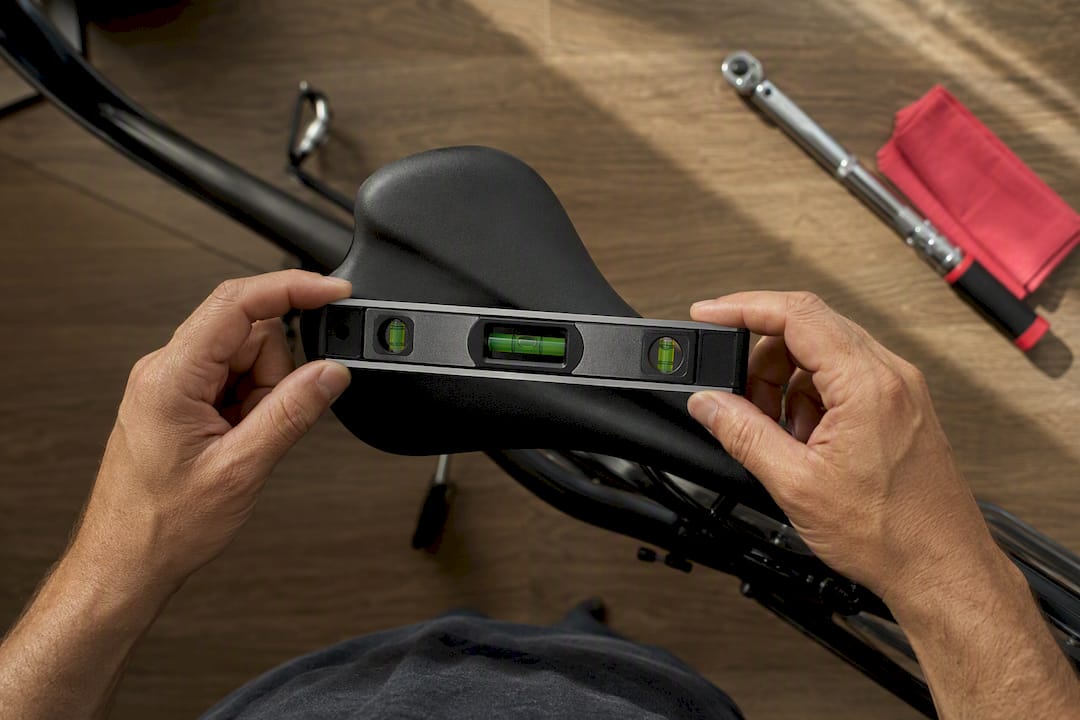
Tilt matters too. Start dead level using a spirit level across the saddle rails, then adjust only in small degrees, a hair nose down for comfort or nose up if you’re sliding forward on climbs. If pressure or numbness persists after tilt adjustments, the saddle’s width or shape may not match your sit bones, and it’s worth trying a different model.
Handlebar Reach and Height: Comfort Without Losing Control
Three terms matter here: stack is how tall your front end sits, reach is how far forward it extends, and drop is the height difference between saddle and bars. You don’t need exact numbers to start. You need to feel whether you’re straining.
For comfort-focused riding, handlebars near or slightly above saddle height work well. Lower bars improve aerodynamics but require more flexibility and core strength. Mountain bikes generally favor a shorter reach and a more upright stance for control on technical terrain.
Stems are the primary lever. A shorter or longer stem changes reach directly; headset spacers raise or lower the front end without touching reach much. If your neck, shoulders, or lower back complain on longer rides, raising the bars or shortening the stem often resolves it. Sometimes the fix is even simpler: tilting the bars slightly upward can relieve pressure on your hands and sit bones without buying a single new part.
Cleats and Pedals: Where Foot Placement Protects Your Knees
Start with the ball of your foot roughly over the pedal spindle. That’s your baseline for both clipless cleats and flat pedals, though flat-pedal riders have more freedom to shift their foot mid-ride since nothing is locked in place.
For clipless setups, set the lateral angle so your toes point naturally, not forced inward or outward. Most cleats offer “float,” a few degrees of rotational play that lets your foot pivot slightly through the pedal stroke instead of locking your knee into one fixed track. More float suits riders with knee sensitivity; less float suits riders chasing maximum power transfer.
Fore-aft position matters just as much as angle. Once you find a placement that feels natural, trace the cleat outline on your shoe sole with a permanent marker before you ever loosen the bolts again. That mark is your reference point if something shifts or you swap shoes down the road.
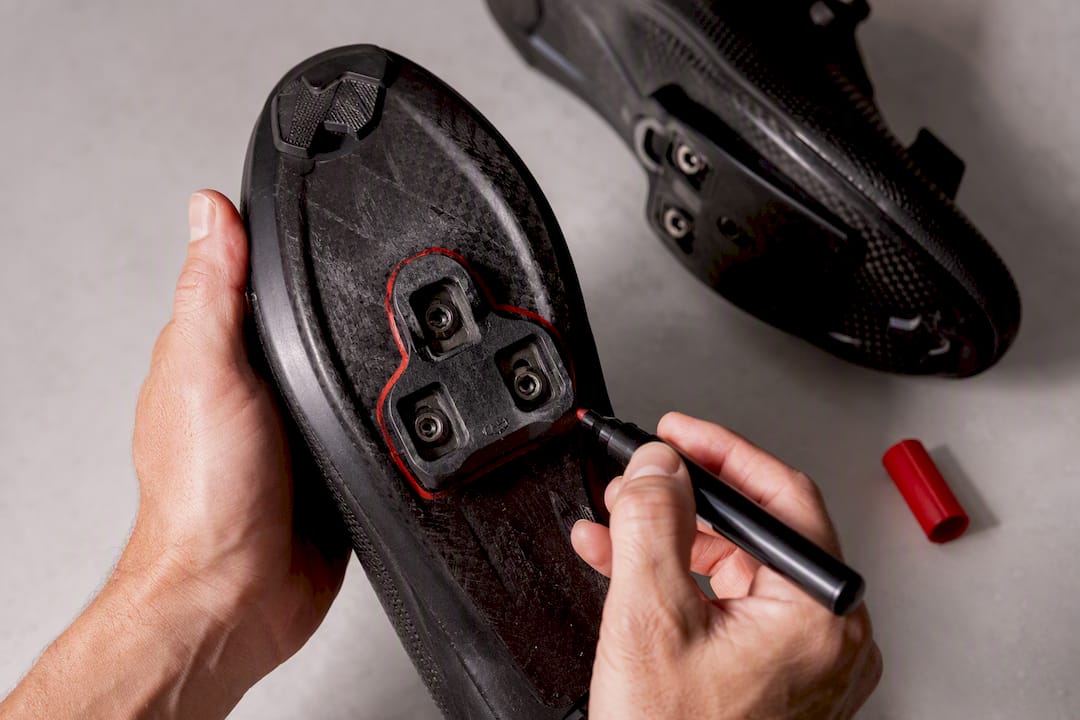
Pro Tip: Make one cleat adjustment at a time and ride at least one full session before changing anything else. Cleat angle and saddle position interact, so stacking multiple changes at once makes it nearly impossible to tell which fix actually worked.
The DIY Workflow: Tools, Setup, and Video Verification
You don’t need a fit studio to get a legitimate baseline. You need a stable bike, a way to measure, and a way to check your own position objectively.
Tools: a trainer or front-wheel block, a spirit level, a tape measure, a smartphone camera, and a set of Allen keys.
- Mount the bike on a trainer or lean it against a wall with the front wheel blocked so it can’t roll.
- Lay the spirit level across both wheel axles to confirm the bike itself is level before you measure anything on it.
- Set saddle height using the heel method or the inseam formula, then re-check with the plumb line for fore/aft.
- Adjust bar height and reach, checking elbow bend and shoulder tension while gripping the hoods.
- Set cleat position and trace the outline for future reference.
- Have someone film you pedaling from the side. Check knee angle at the bottom of the stroke and torso posture on the hoods and drops.
A level, stable baseline is what separates a useful test from noisy, unreliable measurements. An unlevel trainer or a bike leaning on a kickstand will throw off every angle you try to check afterward.
Symptoms and Troubleshooting: Matching Pain to the Fix
Your body is the most honest fit gauge you have. Front-of-knee pain generally points to a saddle set too low; pain behind the knee usually means it’s too high. Numb hands suggest too much weight on the bars, often solved by raising them slightly or shifting weight back through saddle position. Hot foot, that burning sensation across the ball of your foot, often traces back to cleat position sitting too far forward or shoes laced too tight.
Saddle sores and persistent numbness in the saddle area point to width, tilt, or fore/aft position rather than the saddle model itself. Try one adjustment, ride it out for a session or two, and reassess. If pain is sharp, radiating, or doesn’t improve after a few rounds of small changes, stop adjusting and talk to a professional fitter or a doctor. Chronic joint pain from a bike that’s slightly off is a warning sign, not something to pedal through.
When to See a Professional Fitter
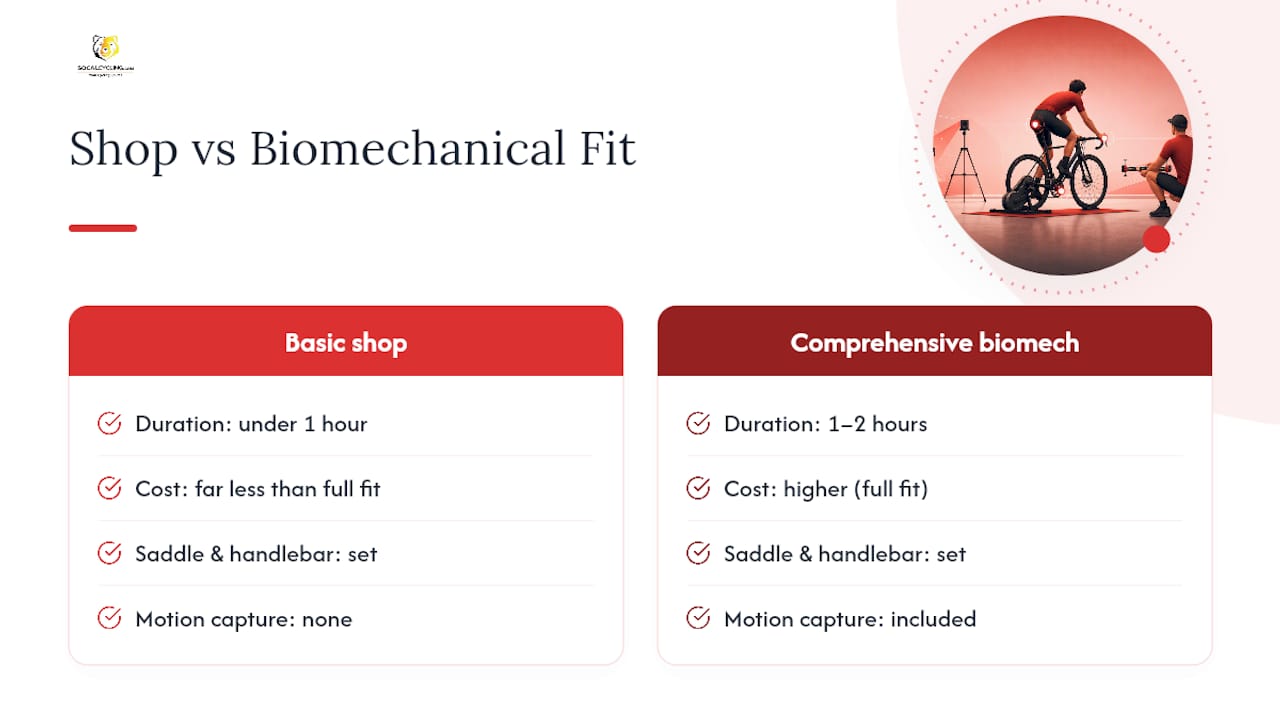
A basic shop fit usually covers saddle setup and handlebar position in under an hour and costs far less than a full biomechanical fit, which adds motion capture, pressure mapping, and detailed leg-length or asymmetry analysis. Expect a comprehensive session to run one to two hours, including an interview about your riding history, a physical assessment, cleat setup, and time pedaling on a trainer while the fitter watches and adjusts.
Book a pro fit if home adjustments haven’t resolved recurring pain, if you’re chasing a performance goal like a century or a race season, or if you suspect a leg-length difference. Bring your own shoes and pedals. Plan to revisit your fit after major changes in training volume, an injury, or simply every season or two as your flexibility shifts.
How a cycling resource can fit into your fit journey
Getting your position right is only step one. Riders training for distance or racing often pair fit work with structured strength training to fix the mobility limits that a bike fit alone can’t solve, and a functional fitness program can round out the off-bike side of that work. If you’re building toward a specific event, our guide to century ride training covers how fit demands shift as your mileage climbs. Riders switching disciplines should also check our gravel bike setup guide, since terrain changes the ideal cockpit position.
Keep a simple log of every adjustment you make, the date, and how it felt after a few rides. That record is worth more than memory once you’re three changes deep into dialing in a new bike.
Get Help Finding a Local Fitter
Some fit problems need hands, not just a checklist. If you’ve worked through the adjustments here and something still feels off, your local bike shop is the next stop. Many shops host community events where you can talk directly with mechanics and fitters before committing to a full session, a good way to find someone whose approach matches how you actually ride.
A Fitter’s One Rule Worth Following
If there’s a single rule worth taking from all of this, it’s patience. Change one thing by 3 to 5 millimeters, then ride it for a session or two before touching anything else. Stack three changes at once and you’ll never know which one actually fixed the problem, or which one made it worse. Log every tweak, and revisit the whole setup each time your training load or flexibility shifts.
— SoCalCycling.com
Sources
- Bike fit (UC Davis Sports Medicine)
- Cycling injuries and bike pain (Ohio State Health)
- DIY road and mountain bike fit (British Cycling)
- Bike Fit: Benefits, Tips for Home Adjustments, When to See a Pro (Bicycling)
- How to get your road bike position right: DIY bike fit for beginners (BikeRadar)